Wednesday, October 13, 2010

The Demons of Demon's Souls

I've been playing a whole lot of Demon's Souls lately. But at the time, I've been sorta bored.

So, for no particular reason, I'm gonna write about my experience fighting each Demon in the game. I'll update it as I feel like it. Disclaimer: I've gotten through the entire game thus far with lv6 Magic (meaning I haven't cast a single spell), so I probably won't have much to say regarding magic strategies. The general consensus though is that you'll do fine as long as you can keep your distance. This is easier with some bosses (Phalanx, Tower Knight, etc) and much harder with others (Flamelurker, Penetrator)
World 1: Boletaria

Compared to other worlds in the game, Boletaria's actually a pretty friendly place, which is fitting since it is the setting of the first level. The most consistent threats here are enemies that like to ambush you, be it from behind, from the shadows, or when you walk around a corner. Proceed with caution, and you'll be just fine.
Boss 1: Phalanx
You have to beat Phalanx to get access to the rest of the game, so it's a good thing he's a pushover. Remember those black slime thingies that like to hit you spears and have shields for faces? You'll be fighting basically a horde of those. Phalanx is a giant, harmless mound of sludge that is covered by the smaller spear toting slimes (his name is actually quite fitting, thus). The arena you fight him in is very large, and has pillars you can duck behind for cover, so take your time, and retreat when you need to. The real fight here isn't against Phalanx, but against his numerous bodyguards. This fight is an absolute breeze with magic and/or firebombs and turpentine, but if you decide to go without, it still won't be hard, I promise. Just don't let yourself get surrounded, because it's not impossible to be overwhelmed if too many of the slimes get a lock on with their attacks.

Boss 2: Tower Knight
The Tower Knight is a huge step up from Phalanx, that's for sure. As soon as the battle begins, run right past the big guy and toward one of the staircases on the right or left (you really can't miss them). There will be a crossbow soldier at the top, ignore him. At this distance the Tower Knight will be preparing his long range attack, which will do significant damage if it hits.
Run into the room right beside the crossbow soldier, and catch your breath (this is a completely safe zone). When you're ready, dart back and slay the guy you ignored before, then turn around and continue to kill each of the guys along the wall, while being careful not to get hit by the TW's magic attack. Try to kill them in one hit, because there's a very good chance your first attack will knock them off the edge. If the fall doesn't kill them, they could be a nuisance later (you don't want to have to deal with them on the ground). Work your way around and kill all of the cross bow soldiers. If you're a magic user, if you time your cast correctly, you should be able to hit the Tower Knight in the head and kill him that way. Melee users will have to get up close and personal. Try to make sure the Tower Knight isn't standing right up against a wall when it comes time to fight him directly. It can make spacing difficult. If he is, go stand as close to him as you can on the wall, and he'll eventually leap backward, placing him closer to the middle. When you're ready, dart down the stairs and make a beeline for him. If you catch him as he is finishing up the attack animation for his long-range attack, he'll likely switch to close range attacks; in other words, he'll try to crush you with his shield. Get behind him as fast as you can, and start slashing at his heels. Meanwhile he will stomp, smash his shield on the ground, and leap backwards, all in an effort to turn the tables. If you find yourself suddenly standing in front of him, retreat a good distance, then come back in. Decently timed rolls can dodge his long range attacks and lance thrusts. If you get too tenacious, you may get a shield bash to the face. Once you hit both his heels enough, he'll fall on his back. Be sure not to get crushed by his body when this happens. Run around to his head as fast as you can and get slashing. A magic weapon (such as the Crescent Falchion +1 in 4-1) will likely finish him in one combo. Otherwise, he'll soon get back up. Hit his heels again until he falls, rinse and repeat. There's very little room for error during this fight, so don't feel too bad if you slip up just once and find yourself crushed under his shield.

Boss 3: Penetrator
If you're fighting Penetrator without Biorr at your side, I have no advice for you, except to keep your distance at all times, and only move in to attack with extreme caution. Otherwise, be sure to free Biorr before going after Penetrator. You'll find the keys to his cell on one of the fat ministers (the dudes who throw fireballs) in the level. Biorr's cell door is located in the room right before the Tower Knight arena (near the two blue knights), opposite of the stairs leading up to the crossbow soldiers. He is guarded by a minister. Free him, and he'll appear in the Nexus. Now, when you go to fight Penetrator, he'll appear to help you out. Biorr does a decent bit of damage, but what makes him most useful is that he draws Penetrator's attention quite easily with hits Greatsword. But even Biorr can only take so many hits before he falls, so don't lollygag. Add in hits of your own however and whenever you can, but watch out for the Penetrator's wide sweeping attacks. Try not to let Biorr die, as he'll return to help you out in later battles.

World 2: Stonefang Mines

The Stonefang Mines aren't too bad, if you proceed with caution. Many areas are darkly lit though, and there are a lot of side routes that can lead to your destruction. Most of the enemies here have pretty thick natural armor, and will shrug off many of your attacks with ease, while dishing out their own. For the miners in particular (sluggish dudes that are usually hunched over doing something until they notice you), bring a piercing weapon, like a spear, use magic.

Boss 1: Armor Spider
Like all other bosses in world 2, the key to beating the Armor Spider is patience. If you have a large shield like the Purple Flame Shield (or even the Steel Shield you can find in 2-1), this shouldn't be an ordeal. I recommend heavy armor for this encounter. As soon as the battle begins, run up to the boss with your shield raised. His first attacks will likely either be spewing fireballs at you or web. The web will slow you down, but don't panic; continue your advance. At close range, the spider will start striking at you with its limbs. Stand right in the middle, staring it right in the face. The spider has two melee attacks. One is a sideways strike; relatively harmless, just stand and block it. The other is a downward lunge with both its front limbs. If you're standing in the middle, in front of its face like I told you to, this attack will miss you entirely. After this attack, the boss will sit there for a few seconds staring into space. This is your cue to strike. Occasionally you'll see it rear up and its mouth will start glowing with flames. Turn around, and RUN AWAY. The armor spider is about to spray most of the arena with a continuous flamethrower attack. Run all the way back to the fog gate and hug the wall, and wait for the fire to subside, then advance once more. The key to this strategy is absorbing every single attack it throws at you with your shield, attacking when you can, and running when it's getting ready to fry you. If you follow these instructions carefully, the Armor Spider won't be a problem.

Boss 2: Flamelurker
Other than the Tower Knight, Flamelurker's probably been the hardest boss in the game for me thus far, simply because there's no methodical way to beat him, and he can destroy you in just one or two hits. Once again, don't get too eager, or this guy will smash you into oblivion. There's a couple ways to approach Flamelurker (legitimately, that is). Magic users can try keeping their distance and loosing off soul arrows and whatnot, but Flamelurker is a tenacious combatant, and will constantly try to close the distance. It's important to note that, like some other bosses in the game, Flamelurker won't attack you until you approach him, so if you have any last-minute enchanting to do or items to consume, do so before you run forwards. Having beaten him twice, I used two different equipment methods to beat Flamelurker, but both of them involved a lot of shielding. Whatever you do, avoid sustaining a hit from him. Block it if you have to, dodge it if you can. He attacks too frequently for turtling to be an effective strategy (each hit was worth about 70% of my stamina). All I can say is, try to get in one or two hits when you can, and never let up on your defense. At around 30% health this guy gets angry, and gets even more relentless. This is when things can get very tricky. He has only a couple attacks, but all of them are devastating. The normal one is a quick swipe. It's his weakest attack (but still does a lot of damage), and can be safely blocked. He'll also swipe downwards, creating a small but substantial explosion. This becomes his most frequent attack once his health reaches critical levels, and will drain your stamina in just one or two hits. It has a little more build up than his melee swipe though, and, if successfully dodged, gives you a small window of opportunity to counter attack or grab a breather. He'll also raise both his hands and growl menacingly before slamming down, creating another, more forceful explosion. He often rolls right into this after a one handed explosion swipe, which may break your guard, leaving you open for this one, which will do lethal damage and knock you off your feet if you get hit by it. His final attack is a pounce. He won't start doing it until he's taken some damage, but it has surprisingly little build up, and can be difficult to deal with. If you manage to see it coming, roll forward. I know this may all sound frightening, but trust me when I say that it's very easy to settle into Flamelurker's pace, and if nothing else his attacks will almost never surprise you. The most difficult aspect of the battle is finding opportunities to get in some damage of your own.
How should you prepare yourself for this battle? If you feel confident in your ability to roll out of harm's way, go for some light armor and do what you do best (but still use a heavy shield). For the rest of us, stock up on flame-retardant equipment. The Purple Flame Shield is a must if you have it. Otherwise, the Steel Shield will do just fine, though prepare to take a little more damage per hit. As for armor, if you're not going light, you might as well go as heavy as possible. The ultimate armor for this fight is probably the Brushwood set guarded by Miralda in 1-1, as it has high fire resistance and damage mitigation. But its extremely heavy, so you might not be able to equip the whole set.

Boss 3: Dragon God
The Dragon God is pretty easy. By the time you get to hit him directly, about 90% of his health will be gone. But to make the fight even easier, equip a Thief Ring. Right after the Flamelurker archstone, there's a long hallway. Run past that hallway and you'll meet the Dragon God. He'll smash the wall in front of you, but don't worry, he can't hit you unless you're standing on the edge. The path ends in a "T". If you have Pure White World Tendency, there's a real cool sword waiting for you towards the left. It's not going anywhere though, so unless you're afraid of dying in body form and losing your PW tendency, I wouldn't take the unnecessary risk of going to fetch it just yet. Instead, go right, and hide behind a pillar. You'll see some debris blocking your way. With a bit of jerry-rigging with the aim (aim with a bow first), magic users can safely break apart most of these barriers from the safety of cover. Melee users once again get the short end of the stick, but don't worry. There are two things to pay attention to regarding the Dragon God: his eyes and his roar. If his eyes are yellow, he doesn't know where you are. If his eyes are red, take cover until they turn yellow again. If you dont have time to look for his eyes, listen for him to roar. When you dash out of cover to start hacking up a pile of debris, you'll hear him start hollerin' after a second or two (it takes him slightly longer to find you if you have a Thief Ring equipped), which is your cue to get back to safety. Keep progressing and you'll get to a machine with a blue glowing stripe. Push X near it to fire a huge spear at the Dragon God, taking about 45% of his health. He'll smash a nearby area in pain, revealing a staircase you can descend, to a path that will take you to the next machine. Fire that one and he'll be almost down, completely docile. To finish him off you have to hit the large white horn sticking out of his chin. If you go melee, the only thing you'll have to worry about is his panting; each exhale is hot enough to do damage. Magic and bow users can play it safe and just snipe him to end the battle. An easy silver trophy.

World 3: Tower of Latria


The Tower of Latria is a dreary place, to be sure.  Though there are some enemies here that you'll want to be weary of (such as the squid guards), for the most part they are pushovers.  Instead the world relies more on puzzles and tricks to get in your way, making it perhaps the most like a typical Zelda dungeon; you'll navigate labyrinthine passages in search of keys and switches to open doors and clear obstacles, and face bosses who aren't what they initially seem.  Patience and logic here will go farther than combat prowess.


Boss 1: Fool's Idol
Before you take on Fool's Idol, there's someone else that you need to kill. Behind the arrow ballista (that giant machine that you can turn off), there's a doorway leading to a staircase spiraling up a narrow tower. Follow the staircase and the long upper path following it into the chapel, where you'll meet another dregling. He has a harmless enough disposition, and swears not to get in your way. But obviously he's up to magical shenanigans, if the glowing runes on the wall and floor are anything to go by. Kill him. If you don't he'll revive the boss over and over again until you do kill him.

Fool's Idol is a breath of fresh air compared to many other obstacles you'll encounter in the game. For one thing, she probably won't even bat an eyelash at you until you either get right up in her face or start up a ruckus with the mooks stumbling around. Speaking of the dreglings, I wouldn't suggest devoting too much of your attention to them. They're barely aggressive, and easy to avoid. If you want to get the boss's attention and get this battle underway, while also grabbing a unique weapon, run around behind the shrine the boss is sitting on, and you'll find the Baby's Nail.

Fool's Idol's primary attack is a cast of Soul Arrow (or is it Soul Ray? I'm not a magician, so I don't know). It does hefty damage, but it shouldn't kill you in one hit. After you've done some damage, she'll make illusory clones of herself. Only one of them is the real boss, but all of them are capable of hurting you and taking a hit or two before vanishing. An easy way to tell is by looking at their attacks. The clones shoot puny little magic bullets. The boss still casts Soul Ray. I've heard the grunts will also gesture towards the real boss, though I didn't think to pay attention to this.

You may notice some glowing spots on the ground sometimes. This is Fool's Idol setting up a paralysis trap. The spots will glow momentarily, then disappear, but the trap is still active. If you step on them, you'll be stunned for a bit, leaving you vulnerable to some punisment (you'll be familiar with this if you've ever had an assault on a squidhead guard go awry). Melee players can end this battle pretty quickly, just be sure to make a note of where the paralysis traps are, and avoid them. There are stone columns you can hide behind for cover if you prefer a ranged strategy. The only thing you need to look out for is the placing of the clones. They're usually widely positioned, meaning hiding from one may leave your back open to another. Just be wary of this, and you'll be okay.

To get Fool's Idol's soul, and return to the Nexus via the 3-2 archstone, approach the alter after beating the boss (assuming she isnt about to revived by that one mook). A cutscene will ensue. Follow the stairs upward and grab your prize.

Boss 2: Maneater
When you arrive in Maneater's arena, the first thing you'll see is a pair of green glowing eyes feverishly making their way to you.  Don't worry, it's just the boss.  But you don't want to fight him where you are; the walkway is too narrow.  Instead, make your way to the large torch, surrounded by a circular platform.  Here is where I made my stand.  Maneater is not very difficult.  He has a live snake for a tail that contributes to some of his attacks though, so it may be a good idea to target that and kill it.  I decided to focus on the boss himself.  Maneater has a few melee attacks.  The dangerous one is a fast and hard shoulder charge that will knock you some distance if he catches you fullbore with it.  The attack itself doesn't do much, but chances are it will leave you uncomfortably close to the edge of the platform.  The first time I fought Maneater, the battle was over in less than a minute because I chose to meet him on the walkway, and was knocked into the abyss.  Other attacks are various ground pounds.  I'd recommend trying to block them rather than rolling out of the way, since you have precious little real estate to work with.  Block his attacks and return in kind, backing away to heal when you need to.  Heavy armor is useful for weathering this fight.


Soon enough another Maneater will appear in the area.  If you haven't killed the first one yet (which is extremely difficult to do), you'll have to fight them both.  Hopefully you'll be at least close to finishing off the first one though; concentrate on killing that one ASAP, because fighting them both at the same time is no easy thing.  Like the gargoyles in the rest of the stage, Maneater will often take flight.  Sometimes it will attack from a distance while flying, so don't let your guard down.

Boss 3: Old Monk
Like pretty much every other 3rd stage of a world, the Old Monk's stomping grounds are quite small.  You'll go up a long winding staircase, encountering several of those centipede things from 3-2, and two black phantom squid guards.  Note that these enemies are a little toucher than their counterparts in other parts of the world.  The Old Monk is extremely unique in that it will try to force a taste of PvP down your throat.  As you fight your way up the stairs, the game is working on summoning another player to your world as a black phantom, to wait in the boss arena and serve as your final adversary in world 3.  You'll know it has succeeded in this task when you get the message "______ has invaded your world!" (the typical black phantom arrival message).  At the top of the stairs you'll encounter a fog gate to the boss arena.  Given the intended nature of this battle, there's no one strategy to keep in mind.  Remember that the player is just like you, meaning that he/she can heal themselves using grasses and abilities, and has limited MP and stamina.  Their health bar will of course be that of the Old Monk's.  The only tip I have is to run or roll forward as soon as you enter the fog gate.  It's very common for players to lie in wait right beside the entrance and start swinging as soon as their opponent enters.  I know, because I did that too.  Furthermore, the player is aided by several little orbs that will appear around them and fire at you autonomously.  What I like to do, both as the boss and the player fighting him/her (since you can play both roles), is use the Dragon Bone Smasher found in 2-3.  There are few enemies that can block it without being knocked away, and fewer players that can do so, I suspect.  One swing of that blade will, if nothing else shatter their guard, or best yet, take a sizable portion out of their health.  It's slow and easy to avoid however, and especially annoying to use in laggier situations.


If all the players you get seem to be kicking your butt, you can try playing offline, in which case the game generates an AI knight to fight you, who's easier by leaps and bounds.

World 4: Shrine of Storms


Other than world 1, world 4 is really the only area that relies pretty much on the brute strength of the enemies residing there to challenge you.  You will sometimes traverse perilous cliff faces and should watch out for the infrequent (but potent) trap, but for the most part it's the enemies you'll want prepare for.  They're a more reasonable lot than is expected in this game, often awaiting your approach full in the open, but nearly all of them will prove to be some of the trickiest adversaries in the game.  The most common enemies here are skeletons of the silver, gold and black flavors.  Silver ones will roll towards you with with frightening speed and attack tenaciously.  Gold ones wield giant cleavers and are usually found in pairs.  Black skeletons are mini-bosses in their own right.  There are only four of them across the entire world, but all of them are deadly.  For the much of the time spent in this world, you'll also be constantly hounded by flying mantas that will lob giant spears at you from above.

Boss 1: Adjudicator
Adjudicator is a little bit like Vanguard. But overall, the Black Skeleton guarding the entrance to his arena is likely more of a threat than the actual boss is. Despite the fact that where you start, you can't even see Adjudicator because you are above his head, don't be fooled into thinking you're safe. As long as you are on a ledge, he will lash out at you with his long tongue. If you're playing melee, your objective should be to get to the ground level as fast as you can. Try to not stop moving, for risk of getting licked. Once you're at his feet, circle around till you see a bloody spot on his side (there's a broken cleaver sticking out of it). This is the only place you can hit him to any effect; other places are covered by a thick layer of fat that will repel your attacks. If you stick closely to this side, you'll likely have no trouble whatsoever dodging whatever he attempts to throw at you, as the arm on that side is shriveled up and doesn't pose a threat. After striking at his wound enough, he'll fall over. Just like with the Tower Knight, get over to his head and start wacking. Just a note, this battle went very quickly with the Dragon Bone Smasher.

Boss 2: Old Hero

Haven't beaten yet...

Boss 3: Storm King

Haven't beaten yet...

World 5: Valley of Defilement


This place is unique in that it's not the enemies, but the environment that will frequently be your undoing. While there are a couple exceptions, most of the enemies are the very definition of pushovers, instead relying on cheap tactics like poison and playing dead to try and gain the upper hand. The Valley of Defilement is said to be a dumping ground for all the garbage filth, and unwanted baby fetuses (you'll encounter plenty of those). It shows. There are literally waterfalls of filth raining down from above. Most of 5-2 and 5-3 is composed of a thick swamp that will quickly infect you with poison and plague as you wade through them. 5-1 is basically a giant abyss that you'll be hoping you don't fall into as you traverse precarious rope bridges, and cheaply built wooden paths built into the cliff sides. Bringing heavy armor would not be a bad idea for this world, as rolling around is not a good idea in 5-1, and downright prohibited in 5-2 and 5-3. Also, bring some way of dealing with poison. Resistant armor and rings will help, but restorative miracles and lotus items will probably take you farther.

Boss 1: Leechmonger
I never really got to examine Leechmonger up close, but he appears to be a giant wriggling mass of leeches. All the hints point towards it, to be frank. Like with Adjudicator, you'll start the battle way above Leechmonger's head. You can try to get some potshots on him with arrows from quite a distance away, but he'll just regenerate. But arrows and/or magic are still the safest way to take this guy down. You'll need to descend until you're much closer to the ground (but still at or above his head). By this point he'll have started shooting leech balls at you. These do fair damage, and cover you in leeches temporarily that will continue to do minimal lasting damage. But overall, this isn't a very painful attack, and as long as you pay attention to your health bar and heal when you need to, you'll be able to take this guy down real easy with a few arrows or magic (I recommend fire magic, or what I used: the lava bow). I don't have specific advice for melee people, but I don't imagine it would have been that much harder. Leechmonger doesn't seem to be a very hard hitter.

Boss 2: Dirty Colossus
Though he may seem intimidating from a distance, but the Dirty Colossus is really just a big softy, almost any way you spin it. He fights a lot like Vanguard, except he's even easier to dodge. His main attacks will be swinging at you with his arms, and rapid-shooting flea balls at you, which do lasting damage, like Leechmonger's leech balls.

Boss 3: Maiden Astrea
There are a couple ways to approach this battle. Maiden Astraea herself isn't much of a threat. The threat comes from two things. First, just as you've come expect from this world, the swamp she calls home is deadly. It's slightly different in that you'll catch disease--not poison--almost as soon as you dip your toe in it. It's also home to a number of plague babies (the aforementioned unwanted baby fetuses). I would not under any circumstances recommend trying to take them on in melee. They're faster than you, and will very quickly surround and overwhelm you; all with disease nipping at your ankles. Your other, more prevalent threat is Astraea's guardian, Garl Vinland. He's a fully armored knight, and won't go down easily if you try to fight him fairly. That's why I used my Dragon Bone Smasher to continually send him flying until he was defeated. If you can defeat Garl Vinland, Maiden Astraea will surrender, giving her Demon Soul to you and committing suicide.

Saturday, October 9, 2010

Metroid: Other M

I've never been a huge fan of Metroid games. I liked Metroid Prime 3, and have played Fusion and and the first Metroid Prime..but, in those games, when it hit me how nonlinear they were, I found the scope of the games to be a little overwhelming.

But, as is part of its draw, Metroid: Other M is drastically different from the rest of the series. First of all, the game actually features a fully voiced story sitting front and center. Second, it's quite linear. Two things that the Metroid series are definitely a stranger to.

Metroid: Other M's story is that of Samus's past. It starts right after Super Metroid (I think that's the one?), featuring an epic CG cutscene of the baby Metroid sacrificing itself to give Samus the power to end Mother Brain. Returning to Galactic Federation headquarters, Samus reports the results of her mission, and then sets out once again. She receives a mysterious distress signal however, coming from what appears to be a giant, abandoned Galactic Federation research vessel known as the Bottle Ship. There she soon makes contact with a squad of GF marines, there on a mission of their own. The squad is led by Adam Malkovich, who was Samus' commander during her days in the military.

While there is a story here full of foreshadowing, twists and turns, that's all just an excuse to portray Samus's interactions with Adam, which in turn allows the game to spend a lot of time talking her past, consequently fleshing her out as a character. Samus has always been seen as the stoic type, a hardened combatant who does what she needs to to get the job done. That persona is shed here, for better or for worse, revealing the person under the battle armor.

Other M is still mostly a Metroid game, though. Stages still range from natural alien environments (courtesy of advanced holo projectors) to dark, deserted space ship corridors. You're still saving and having your health refilled exclusively at save/map stations. And you're still eliminating alien monsters with extreme prejudice.

But there are a number of things different, too. First and foremost is view point. Most of the time the game is in 3rd person view, where you control the game via the Wiimote, held sideways. The camera is fixed, but moves on its own frequently to provide better (and definitely more cinematic) views of the action. Kinda like in Sonic Unleashed, the camera also often switches to a 2D perspective, which is pretty cool in my book.

In 3rd person, Samus auto-aims her cannon at the closest enemy she's facing, which works well for the most part. But for those times when you want to aim at a specific part of an enemy's body, or look around your environment for clues (which you'll be forced to do occasionally), you can point the Wiimote's IR sensor at the screen to go into 1st person mode. Depending on your position relative to that of the Sensor Bar, this can and will take getting used to doing on the fly, and even with practice it's still not something you'll feel comfortable doing in the heat of combat. Also, you can't move while aiming.

Speaking of combat, it's probably the highlight of the game. Combat in Metroid: Other M is a fairly simple affair, but it's fast-paced and fluid. As mentioned previously, Samus will do the aiming for you in 3rd-person mode, so your focus is on keeping her out of danger, and finishing the enemies off. Samus can use her back thrusters to dodge attacks by tapping a direction right before one connects. This will usually activate a split-second of slow-mo, and also give you the opportunity to immediately loose off a fully-charged power beam shot, which normally takes several seconds to charge. Nearly every enemy in the game can function as a sub-boss; meaning they can kill you in a surprisingly small number of hits. So this dodge function is an integral part of staying alive. Most enemies can also be finished off with cinematic flair, once they hit a certain damage threshold. One such finisher has Samus tackling her foe, with the two them rolling across the ground ending with Samus on top pinning it, and loosing off a charged blast. Another involves Samus headlocking an enemy and finishing it from there. For once, full-fledged bosses aren't the only ones that get cutscene-quality finishers. This is definitely a cool thing.

What's not cool, however, is the way Samus acquires upgrades to her suit throughout the game. The game makes it clear that Adam is special to her, serving as a father figure of sorts. Which is why, out of respect for him and his team, Samus basically shuts off all of her weaponry acquired throughout Super Metroid except for her basic power beam and morph ball bomb. She only enables them once more as Adam gives her permission to. This is all fine and good I guess, until you get to some scenarios where you have to wonder how silly Samus's devotion to this policy can be. The notorious example is where you first enter a gigantic cave filled with lava. The place is so hot that without her Varia Suit functions activated, Samus gradually loses health as she runs through it. Does Adam not care enough for her health to immediately grant her access to her Varia Suit's heat shield? Does Samus not care enough about her health to grant herself access? Who knows? We all understand this was done for the sake of difficulty pacing and such, but sometimes it gets absurd.

When you're not wrestling enemies to ground or listening to Samus reminisce about the past, you're running toward your next objective. Though it doesn't feel like this, you really are usually just running from point A to B, then when you reach B, the route to C is revealed, and you run towards that. And so it goes. Uncharacteristic of an adventure game, there's not really much in the way of puzzles in Other M. The only things stopping you from getting somewhere are usually enemies, or a path that can only be traveled using equipment you aren't yet authorized to use. Perhaps as result, this is a pretty short game. I don't have any real statistics for you, but I beat it after one day and one evening of play, and that was with some hunting around for extra missiles and energy tanks. After you beat it, there's not a whole lot of reason to back, except for the usual collectible upgrades. There is a neat video gallery though, where you can watch all of the cutscenes unlocked thus far, and also watch all of them compiled into a 2-hour movie presentation.

The voice acting in Metroid: Other M ranges from cheesy to so-so. Samus's voice acting in particular isn't..quite what I might have expected, but your mileage may vary. The BGMs are serviceable, and do help the environments achieve the mood they may be aiming for. Overall, the audio in Metroid: Other M is really nothing special, but certainly not a bad thing.

The graphics aren't bad either, though most of the character models have a "pasty" design to them, with some looking like they were sculpted out of Play-Doh, or something. I dunno, I'm used to the graphics on PS3, 360 and PC, so it's difficult to comment fairly on the quality of graphics in Wii games. Basically, the graphics don't detract from the experience.

Overall, Metroid: Other M is an interesting game, and was very fun while it lasted. However, it did make me realize something. Samus has always been a cool character. The game's promise to expand on her personality sounded cool on paper, but now I wonder if I may have preferred to continue on just thinking of her as the mysterious and stoic intergalactic bounty hunter she's always previously been portrayed as. Food for thought. As for my rating of the game? A 7.5/10.

Thursday, September 9, 2010

Demon's Souls

Demon's Souls is not a typical game. You probably heard as much. Basically, it's a game will beat you over the head with a hammer until you either flee in terror or grab it by the horns and wrestle it to the ground. Christ, this game is hard.

Demon's Soul's is set in the fictional kingdom of Boletaria. Now you see, Boletaria's having a bit of a problem. That is, it's being overtaken by a curse of sorts, which is bringing demons into the land, who in turn are stealing people's souls. The soulless husks that remain hunt down the living and kill them too. In another words, you should definitely cross Boletaria off your list of places to visit. But the curse won't stop at Boletaria. It will eventually wrap the entire world in its embrace.

Here's where you come in. Or rather, where you would have, if Demon's Souls was a happier game. Pressing "New Game" from the main menu lets you pick a class and customize your character's physical traits (it's actually surprisingly extensive). Your class determines your starting equipment and stats.

Unlike the many other heroes who have tried and apparently failed to save Boletaria (and indeed, the entire world) from the evil, you're here to end the curse. Unfortunately, you're not quite as a badass as you think you are. The tutorial, should you choose to complete it, ends with you facing off against a boss twice your size who can slaughter you in a single hit. Naturally, you die (unless you ARE as badass as you thought, and manage to slay him, in which case your life is instead ended via a swiftly delivered claw to the face from a dragon). Your soul is tied to the Nexus, a spiritual realm.

The Nexus serves as the game's hub. You can't do much until you beat the game's first boss (who is deceptively easy), but after that you gain access to leveling up, and a few more NPCs appear. In the Nexus you can find a base level blacksmith, Boldwin, who will sell you some basic equipment, and repair or upgrade any that you already have. Tom acts as a storage, and will hold onto any items you don't want weighing you down during your quest. You can also purchase and learn some miracles and spells (heavenly and devilish abilities, respectively). Finally and perhaps most importantly, you'll find the Maiden in Black in the Nexus, an innocent enough young woman who does most of the housekeeping duties, and buff your stats in exchange for an ever-increasing number of souls. If you're playing online (more on that later), you can view leaderboards of the top players in various categories, such as much trophies earned, most souls obtained, etc.

Forming a half circle of sorts in the middle of the Nexus are several archstones; each representing a game world. Demon's Souls is set up in a very straightforward way. Each world is separated into a few stages, which in turn each contain a demon to be slain at the end of each stage.

Generally speaking, the only living things you'll encounter in Demon's Souls will try to kill you at some point, if not at first sight. But there are some NPCs trapped or in peril in some of the stages (you can get glimpses of them during the loading screens) that you can help out for benefits. Sometimes, after being helped they'll end up in the Nexus as merchants of some sort.

Now, Demon's Souls' notorious difficulty comes from a number of things, but I suspect what drives lesser players away most is the amount of repetition forced onto you. Even though it's technically an action game, Demon's Souls is a game that, above all, requires patience.

Souls are a big part of Demon's Souls, as the name would suggest. A lot of people have lost theirs. You lose yours, and will lose it many more times. Enemies lose theirs when slain. You often find them lying around. Demons have them, and you must take them. Souls, souls, souls. But also, they serve not only as currency, but also as EXP points and upgrade components, in the case of demons' souls. Everyone wants, them everyone needs them. As you travel through worlds, slaying all stand in your path, you'll collect varying numbers of souls. If you can get back to the Nexus in one piece, you'll be able to spend those souls on repairs, stat upgrades, and new abilities and equipment. Everything seems to cost an arm and a leg though, so you'll have to be choosy with how many souls you dedicate to what. Will you blow all your stash on a couple stat upgrades, or spend them on much-needed repairs, and beefing up your equipment?

Souls can get you everything you need in this game, but here's the big catch: If you die, you lose all of them. You still keep whatever items you had on you at the time of death, but all your precious souls are dropped. However, there is a single ray of hope. If you fall in battle, you can restart the stage, and try to retrieve your dropped goodies, with no strings attached. But, every time you restart or leave a stage, all the enemies respawn, so depending on far into the stage you died, some players may be saddened to realize they're better off cutting their losses and trying a different stage. Furthermore, if you die, you come back in soul form (you start off in soul form after being slaughtered in the tutorial), which cuts your HP by 50%. If you don't use a certain item to regain your human form, the only way to get back to full fighting form is slay a demon.

You can't store souls, so you will often find yourself faced with a gamble. Here's the scenario. You're standing right in front of the boss gate, with 5,000 souls that you've collected over the course of your progress thus far. You're not confident you can beat whatever awaits beyond the gate, but if you do, you'll get your human form back, and be rewarded a brand-spanking new demon's soul, very valuable. You feel it would be safer to run back to the Nexus and do some spending to prepare, but if you leave you'll have to fight your back through the stage, as the enemies will have respawned. Will you take on the boss and risk losing everything, or run back to the Nexus with your tail in-between your legs?

Now, the mindset that Demon's Souls beats into your skull is the expectation that you will die at some point or another. With this in mind, do you still choose to fight the boss, almost expecting to come out in a body bag? It's foolhardy, and here's where the repetition comes in. Demon's Souls is almost a game of trial and error in this respect. Rushing forward, sword at the ready will most likely get you killed. Enemy ambushes, traps, and bottomless pits await you at nearly every turn, to the point that you learn to never walk into a new area without your shield raised. But similarly, playing Demon's Souls is like gambling, all or nothing. It's all about knowing when to quit, and when to press on. When you devote 45 minutes to a single stage, carefully progressing through it, only to slip up once and die at the very end, losing all your souls, all that time is basically wasted (unless you picked up some nice equipment along the way). The reality of this sinking in is probably what has proved to be the most frustrating aspect of Demon's Souls.

One final wrench thrown into the difficulty is World Tendency. World Tendency, or WT for short can move between Pure White and Pure Black, depending on certain things you do, and can make your life easier or harder. White tendency makes enemies a bit easier, and also makes certain rare items appear. Black tendency causes powerful Black Phantom versions of enemies to appear, though it too offers some opportunities to obtain rare schwag. Both can open up new areas, or cause certain NPCs to appear. Killing demons shifts the world towards white WT, while dying (in physical form, rest assured) or killing certain NPCs will shift it to black.

WT can also be affected when you're playing online. Demon's Souls' multiplayer is a little different from other games. If I could sum up the online aspect of the game in a single word, that word would be "indirect", probably. As you play, you'll likely see three things.

First, you'll see messages on the ground, written by other players. If it's your first time going through a world, it's a good idea to take a look at these, as it's fairly likely that they'll provide valuable insight about what you're up against. For example, the first boss, while not especially difficult by any means, is a push over if you use fire. I was notified of this by a message I encountered as I traveled through the first level.

Second, you'll probably see bloodstains on the ground. When interacted with, they'll replay another player's final moments before being felled by some unseen force. Sometimes this too can be excellent forewarning; like, for example if you see a player's ghost walk across a bridge, only to fall through the bridge to his death, you can surmise that the bridge will collapse if you follow in their footsteps.

Third, you might see ghosts of other players randomly pop in and out of your game. Personally, this scares the crap out of me, especially in dark places when I'm already tense, expecting an ambush around the next corner.

Demon's Souls can be played in both PVP and co-op, but only under certain circumstances. Specifically, to initiate a co-op game you need to be in physical form, and to initiate pvp you need to be in soul form. Early on, you'll receive two stones, the White and Blue Eyestones. If you're in soul form, you can use the Blue stone to drop a marker on the ground soliciting your services. Other players who are in body form will be able to see your marker and, if they haven't yet killed the demon in the given level, summon you to help them kill it. You'll then appear in their game as a Blue Phantom. The White Eyestone can be used by the host to either send away Blue Phantoms, or by Blue Phantoms themselves to return to their world. Encountering a Black Phantom in your game may net you a Black Eyestone. In soul form, you can use this stone to invade another player's game and try to kill them. If you succeed, you regain your body.

That's Demon's Souls' multiplayer, in a nutshell. Atlus has also hosted a few online events in the past which affect your world tendency (like pushing you to Pure Black WT on Halloween).

That's enough talk about the concept. Let's talk a little about about the gameplay. If I didn't mention it earlier, Demon's Souls is an Action-RPG. It takes both sides of this hybrid seriously. You can cast magic, attack with weapons, block, parry, dodge, sprint and roll in real-time, but none of this matters if you don't have the stats to provide for your plan of attack. Under your MP and HP bars sits your Stamina bar. Each swing of the sword, each attack blocked, every second spent sprinting, every dodge roll costs Stamina. Effectively managing stamina is the key to every combat situation. If you go in swords swinging, you'll be too exhausted to block or evade the enemy's retaliation. But likewise, if you turtle up and sit there blocking the whole time, you won't have any stamina to counter-attack.

There are quite a few different weapon types in Demon's Souls. There's bows, magic, swords of varying sizes (from shortswords to greatswords), spears, , shields, halberds, polearms, katanas, rapiers, daggers, and even throwing knives, to name some. Obviously, various weapons have different pros and cons. Large swords are powerful, but slow. Bows and magic require a steady supply of ammo and MP, respectively. You can equip a different weapon in each hand, provided you have sufficient stats to wield both effectively, and also opt to use both hands on your right hand weapon, increasing its attack power by 50%. Personally, I like to use straight swords, either dual wielding them or paired with a shield. But the point I'm getting at here is, you're not lacking options when it comes to methods of dishing out pain.

In terms of visual presentation, Demon's Souls is just okay. The graphics themselves are quite serviceable, but nothing to write home about. The object physics can be a bit wonky, and I've known the game itself to glitch on occasion. Fortunately, the game auto-saves your progress literally all the time, so you can quit whenever you want and not have to worry about losing anything. The load screens are also of reasonable length.

In terms of overall presentation, Demon's Souls strength lies in the delivery of its theme. From the moment you start the game up and are greeted to a CG cutscene that begins with a corpse being carried through the air, and ends with a knight being greeted by a gigantic dragon with two mouths, you know this is not a friendly world. Corpses are everywhere, and you can practically smell death in the air. Most of the environments are darkly lit (thank god for your light crystal), the future never, ever seems to stop looking grim. When you think about it, the air of hopelessness can make you wonder why you're pressing on.

And perhaps here is where Demon's Souls' greatest strength lies. It forces players to find the strength to continue not from the game, but from within themselves (as cheesy as that sounds). The feeling of accomplishment that you get as you remember all the hardship is pretty significant. If that's not it, search me. But Demon's Souls is obviously doing something right if, even after dying at the hands of the Armor Spider demon after an hour spent fighting through the stage to reach it, I still can't wait to have another go at the game. A 8.5/10

Sunday, August 22, 2010

Trauma Team

The DS has played host to quite a variety of games, many of which let you play as characters from a variety of professions.  The Phoenix Wright series lets you play as a lawyer.  Cooking Mama makes housework fun.  Nintendogs gives you insight into owning a pet.  And the Trauma Center puts players in the shoes of medical professionals so talented they're just about superhuman.

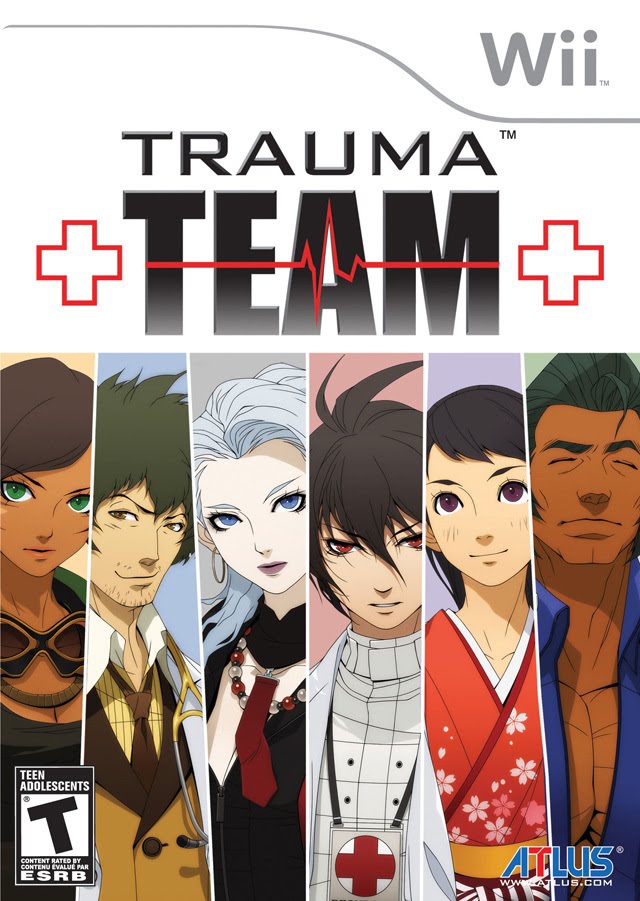
Though its based on the DS, Trauma Team is the series' second foray on the Wii.  You play as six different doctors, each of which handle various steps of the treatment process.

Looking at the box art, let's start on the very left.  We have Maria Torres, who is basically an EMT.  She provides First Response, which means on-site treatment to stabilize patients so they don't die before they make it to the hospital.  She's loud, rude, and impulsive, but she has the skills to back up her claims.  However, even as talented as she is, Maria doesn't believe in the power of teamwork, and is quick to shove away any help from others when treating patients.

Next is Gabe Cunningham, a diagnostician.  He exams patients through various methods, including visual exams, questioning, and X-Ray to diagnose them with a disease, based on the symptoms they exhibit.  Put simply, Gabe's the one who finds out what's wrong with the patient, so that the other doctors know how to treat him/her.  Gabe is laid-back and crude, but is very good at what he does.  He tends to put his job before his personal life, though.

Next is Naomi Kishimura, a medical examiner.  Her role is close to that of a detective, with corpses being delivered to her office, and her job being to illustrate how that person died (and in many cases, why).  She has the ability to hear the dead person's last words through her cell phone, which has gained her the title "Corpse Whisperer" in the tabloids.  Her skill in forensics and reasoning has led to the FBI often working closely with her to solve difficult cases.  Naomi isn't bothered in the slightest by death, and can be cold and distant with others, but even she has a soft side that shows every now and then.

Moving on, we have CR-S01.  He's been in maximum security prison, serving a 250-year sentence for a bioterrorism attack he was convicted for some time ago.  As a side-effect of the gas, he gained amnesia, forgetting everything except for his amazing medical talent.  Because he can't remember his name, he's referred to by his prison number, or "kiddo" by the other doctors.  Given his personality and skill at helping people, nobody, including the very man who arrested him, seems to believe he carried out that attack.  Brought in as a specialist, he is given a chance to reduce his sentence by performing difficult operations, and also in the hopes that letting him take up the scalpel once more will help him regain his memories.  As someone still struggling to identify himself, CR-S01 is quiet, and distant with others.  He is calm, collected and logical, and performs surgical operations at what is believed to be near-superhuman speed and precision.  He is often criticized for lacking passion, though.

Second from the right is Tomoe Tachibana, the heir to the Tachibana group, a rich and powerful family in Japan.  Bad relations with her father led her to leave Japan and pursue her own ambitions in America.  Tomoe is an endoscopic surgeon, meaning she uses an endoscope to treat patients from the inside.  This means you'll control the endoscope directly, traveling through organs to repair any complications observed, such as tumors, excess blood, and hemorrhaging.  Tomoe is determined, and dedicated to her profession, such to the point that she ordered own personal endoscope, built from the ground up to her specifications.  Like CR-S01 though, she often wonders if she really belongs among the friends she's made at Resurgam Hospital, and sometimes has trouble fitting in.

Finally, we have Hank Freebird.  Hank is an orthopedic surgeon at Resurgam Hospital by day, and the superhero Captain Eagle by night.  As Captain Eagle, Hank has superhuman strength and durability, and the ability to fly, though he deals with the typical growing pains all heroes deal with, such as public misunderstanding, and late appointments.  As an orthopedic surgeon, Hank works primarily with bones.  Got a dislocated bone?  Fractured bone?  Shattered bone?  Dr. Freebird's your guy.  Hank maintains a positive outlook on life, and believes in humanity.  Many would call him an idealist.

Trauma Team's story is split between two parts.  Initially, you'll have access to each doctor's story path, composed of several missions.  You can progress through each path at your leisure, switching to another character after every mission if you'd like.  In fact, many of the missions run parallel to each other, so mixing things up may be the best way to absorb the initial plot in a cohesive manner.  However, these stories serve more as character development story arcs, with the grand plot only being hinted at.

Finishing each doctor's story path will unlock access to the Finale.  This is when the plot really starts to move, and all the pieces that you've uncovered through the initial paths fall into place.  The Finale is composed of 12 missions, composed of gameplay from all of the doctors.

Cutscenes are presented in the style of a comic book, with character sprites, speech bubbles, and limited animation.  However, the game puts what little movement shown to effective use, with sound effects and full voicing for all the characters, allowing me to easily imagine a more realistic scene in my head (wierd as that may sound..).  Surgical operations use 3D graphics, but it's not anything to write home about (it is on the Wii, after all).

My primary concern when I tried Trauma Team, however, was how well the controls would work.  After all, in a surgical operation, precision is key!  And I'm happy to say that, for the most part they don't get in the way.  The game makes fair use of all the Wii remote's functions, incuding the mic and accelerometer.  For general and orthopedic surgery, the IR sensor isn't as steady as I would like, but the developers apparently realized this, because the game is pretty forgiving, without sacrificing difficulty.  Most motion gestures are simple, but the controls for Tomoe's endoscope, while hardly unusable, are probably the low point of the game in terms of controls.

Trauma Team didn't seem to get much press or attention when it released, but I for one was pleasantly surprised by its quality.  The plot takes some time get moving, but that shouldn't be mistaken for poor pacing.  The gameplay is fun, and I actually learned a few tidbits about the medical profession from playing (like for example how much of a team activity surgery is)!  Simply put, you'll probably have a good time playing Trauma Team.  An 8.5/10

Saturday, August 14, 2010

Sonic and Sega All-Stars Racing

After being somewhat disappointed to Modnation Racers' lack of what I believe to be true kart-racing spirit, I looked to the next best thing: Sonic and Sega All-Stars Racing.  Now, at first glance this really does come off as a cheap cash-in on Sega's various franchises and characters.  Which is why I partially ignored it when it first came out, instead looking forward to Modnation Racers for my kart racing fix.

Anyway, it seems I was wrong to do that.  Is Sonic and Sega All-Stars worth $50-60?  I don't think I would buy it at that price.  Is it a good game?  Yes.

The whole thing that makes this game great is how straightforward and relatively simple it is.  In other words, precisely how a kart racing game should be.  There's no apparent story; just a few modes to jump into, each packed with gameplay content.

The main mode is the Grand Prix, which is separated into several cups, which in turn are each separated into several races.  Each finishing position (1st, 2nd, etc.) is assigned a point value.  The higher the position, the more points you get.  The racer with the most points at the end of the cup wins.  You'll be no stranger to this system if you've played any racing game ever.

Next is Mission Mode, which is probably designed to introduce you to various characters and play styles.  As it's name would suggest, you are assigned a character, a task, and usually a time limit to complete that task.  Maybe you'll be cruising through a stage as Beat, trying to pull off as many tricks as possible.  Maybe you'll be collecting rings as Sonic, or even participating in mini-race cups as certain characters.  There's over 60 missions total, if memory serves, so there's plenty to return to here.  Additionally, your performance in each mission is ranked (just like in most Sonic games).

Also present is Time Trial mode.  The game ships with a staff ghost (basically a preset time) for each stage, and there's also local and online leaderboards showcasing the best times.  Speaking of online support, this game features a very healthy suite of multiplayer options.  In addition to local 4-player, there's 2-player splitscreen online, and 12 player online racing available.  You can either play with strangers or set up games with friends.

Participating in any of these various play options nets you varying amounts of Sega Miles, which act as a currency you can spend in the shop to unlock more stages, characters, and even music tracks to race to.  The game is packed with characters, locales and other things from Sega's past, including the major Sonic cast, the Bonanza Bros, Billy Hatcher, and even Shenmue and Alex Kidd.  I for one was pleasantly surprised to find Can You Feel the Sunshine (a song from Sonic R) as an available track to be unlocked.  You can view detailed information on every unlocked stage and character in the Collections menu, which is a cool addition if you're looking to learn a little bit about gaming history.

I'd say Sega nailed the spirit of kart racing in this game.  There's a simple balance between the use of skill and items, with a proper slice of both being essential to grab victory.  Just as in any and every other arcade racer out there, drifting is also an important skill, and one you'll probably find yourself forced to use near-constantly to stay on top.  Overall, gameplay is fluid, and feels just right.

The game also runs pretty well with no dips in framerate, glitches, or particularly long load times to speak of, and the graphics aren't bad.  Nothing special, but I don't think anyone will find vault with the game's visuals.

Put simply, Sonic and Sega All-Stars is Sega's answer to Mario Kart.  It's not innovative, inventive, or even particularly standout in terms of quality.  But if you're looking for a decent time, this is most definitely a viable replacement for Nintendo's venerable series.  An 8.0/10.